http://id.nowgoogle.com/
MOST HOT TIPS AND TRICK
- Bikin Software Trial Jadi Seumur Hidup

Ouww masa trial software sudah habis.... Pengen cari crack atau keygen nya susah juga apalagi untuk cari Serial Number nya, ehh ternyata ada juga solusi nya untuk mengatasi agar masa trial bisa jadi selamanya alias seumur hidup..
Begini cara nya... Read more >>


- Meningkatkan Kinerja Komputer

Langsung saja tidak usah kelamaan. Beberapa tips meningkatkan kinerja komputer yang mudah-mudahan berguna buat anda. Tips tersebut sebagai berikut :
Begini cara nya... Read more >>


Tampilkan postingan dengan label windows 7. Tampilkan semua postingan

11 Februari 2010

Cara asik gunakan windows 7 | tips

Berikut merupakan tips bagi pengguna windows 7, ada sebagian yang bilang windows 7 banyak bug nya dikarenakan produk baru. Eits jangan salah sekarang windows 7 dah full, berikut ada sebagian tips yang akan membuat pengguna OS windows 7 makin akrab.

1. Agar Lagu MP3 tetap utuh
Windows 7 memiliki kelemahan di Windows Player 12 karena bug jahat yang dimilikinya. Bug ini otomatis akan menambahkan metadata yang hilang, termasuk album art. Masalahnya hal ini bisa mengakibatkan file tersebut tidak utuh lagi.

Untuk memperbaikinya, install updatenya dari situs Microsoft.

2. Klik Kanan yang bikin mantap
Klik kanan pada bagian kosong di desktop untuk mengatur resolusi layar, jadi tak perlu melalui display setting dulu.
Klik kanan pada ikon Explore di taskbar, untuk mengakses folder sistem yang umum digunakan seperti Documents, Pictures, dan lainnya dengan lebih cepat.
Sedangkan bila tidak ingin menggunakan Internet Explorer dan ingin memindahkannya dari taksbar, klik kanan saja pada ikon IE, lalu pilih "Unpin this program from the taskbar", kemudian instal browser lain.

3. Jalan pintas ( shortcut ) pada keyboard
Alt+P: Untuk menampikan atau menyembunyikan tampilan jendela Explorer
Windows Logo+G: Menampilkan gadget di muka windows-windows lainnya
Windows Logo++ (tombol plus): Zoom in
Windows Logo+- (tombol minus): Zoom out
Windows Logo+Up: Memperbesar ukuran window
Windows Logo+Down: Memperkecil ukuran window
Windows Logo+Left: Bergerak menuju sisi kiri layar
Windows Logo+Right: Bergerak menuju sisi kanan layar
Windows Logo+Home: Meminimize/merestore window lain kecuali yang sedang ditampilkan

4. Bagi Flickr
Sering menggunakan Flickr? Atau malah sudah punya account di Flickr? Untuk mempercepat membukanya, kunjungilah situs I Started Something, kemudian unduh Connector-nya, dilanjutkan Open. Dengan ini, "Flickr Search' akan ditambahkan di folder Searches, pun bisa mencari foto lewat desktop windows 7 sobat.

5. Mengatur UAC (User Account Control)
Jengkel dengan banyaknya 'peringatan' (alert) seperti pada Windows Vista? Eits bisa di atasi kalo hanya seperti itu. Aturlah dengan langkah berikut: Start -> Control Panel -> Change User Account Control Settings.

6. Akses video lebih cepat
Klik kanan pada menu Start, lalu menuju Properties -> Start Menu -> Customize, dan set pilihan video pada "Display as a link". Kini bisa mengakses folder video dengan langkah singkat.

7. Menulis Cakram Digital
Windows 7 akhirnya menyediakan layanan untuk membakar ( kalo untuk bahasa inggris nya Burning ) file ISO langsung ke bentuk CD atau DVD. Untuk memudahkannya, tinggal double klik pada file tersebut, pilih drive dengan disk kosong lalu klik Burn.


 Asik pastinya dan selamat mencoba...
read more...

1 Februari 2010

Cara aktifkan Dreamscene di windows 7 | tips

Mungkin belum ada yang tahu apa sih dreamscene itu..? dreamscene adalah salah satu fitur unik di Windows Vista yaitu berupa video wallpaper ( video yg dijadikan wallpaper ). Sayangnya fitur ini sekarang dihilangkan di Windows 7 ( tidak tahu alasan microsoft menghilangkan fitur tersebut.....? ).

Tapi ada beberapa trick untuk kita bisa aktifkan kembali fitur ini di Windows 7, ikuti langkah nya berikut ini :

1. download program Windows7-DreamScene-Enable.exe
Download sini aja

2. Setelah download, silahkan langsung install ( tidak ribet untuk instalasi nya jadi tenang saja )

3. Sekarang  silahkan download video dreamscenenya dari situsnya langsung dreamscene.org atau bisa cari lewat paman google.. Oh iya format movie yg di-support adl. *.wmv

4. Sekarang pilih file yg sudah di-download tadi, klik kanan dan pilih set as Desktop Background.

5. Dan wallpaper dreamscene kita sekarang sudah jadi...

Tapi program ini ada sedikit bugnya.. yaitu coba perhatikan text di shortcut dekstop... tulisannya pasti agak burem atau blurred. Nah untuk memperbaikinya ikuti langkah2 di bawah ini :

1. pertama buka windows explorer
2. set folder option untuk show hidden files
3. lalu masuk ke directory C:\Users\username\AppData\Roaming\Microsoft\Window s DreamScene
4. disitu bisa lihat ada 2 file gambar, set pada properties gambar menjadi read only dan hilangkan tanda centang di hidden
5. lalu klik kanan di desktop dan pilih personalise > desktop background
6. pilih di bawah di bagian dreamscene dan pastikan kedua gambar di centang lalu set picture position ke Fill
7. simpan
8. Selesai


Gimana dah bisa kan? selamat menikmati dreamscene di windows 7
read more...

17 Januari 2010

Buat 2-3 atau lebih Firefox di windows 7

Mungkin sudah banyak yang tau bagaimana cara nya ada 2-3 atau bahkan lebih mozilla firefox di OS windows 7? kok bisa ya? itu mungkin juga pertanyaan dari kalian semua....langsung aja deh bahas bagaimana bisa ada 2-3 bahkan lebih tuh firefox bisa ada di OS...
Ikuti langkah" berikut ini :
1. Tutup semua window Firefox yang ada.

2. Di window Run, ketik "firefox.exe -ProfileManager"

3. Centang Don't ask at startup dan klik Create Profile untuk bikin profile baru. Tiap profile nantinya dipake satu user tertentu.

4. Kasih nama Profile yang dibuat.

5. Kalo sudah membuat profile-profile yang dibutuhkan tutup Profile manager.

6. Buat shortcut untuk masing-masing profile. Caranya bikin shortcut untuk Firefox seperti biasa dan tambahkan parameter "-P namaprofile -no-remote"
Bikin satu-satu untuk tiap profile.

7. DONE

Gimana ga susah kan?
read more...

6 Januari 2010

Merubah WEI [ Windows Experience Index ] Windows 7

Merubah WEI ( Windows Experience Index )
cuman buat iseng aja ... ga ngaruh ke performa sebenarnya ....alias kosmetik aja bro ...

1. Buka Masuk ke C:\Windows\Performance\WinSAT\DataStore
2. Cari file XML yg terbaru/paling akhir [recent] di saia kyk gini
2009-09-27 01.02.51.799 Formal.Assessment (Recent).WinSAT
terus takeownership file tsb... klo yg belum tau cara take ownership cari di forum ini juga banyak ...
3.Klik Kanan file tsb kemudian open with wordpad
4. rubah semua score yg dikehendaki dng nilai maks 7.9
5. save file
6. cek kembali/restart WEI nya...


heuheuheuheueh

PS : tidak mempengaruhi proses procesor
read more...

windows 7 tweaker - Free

Ultimate Windows Tweaker v 2.0
is a freeware Tweak UI Utility for tweaking and optimizing Windows 7 & Windows Vista, 32-bit & 64-bit. It can simply be downloaded and used as a portable application to customize your Windows to meet your requirements. With judicious tweaking, it can make your system faster, more stable, and more secure with just a few mouse clicks. The tweaker detects whether you haveWindows 7 or Windows Vista installed and accordingly offers you the relevant tweaks only.


Size : 345kb
Portable alias ga perlu install


Link :
Download Here 


TweakNow PowerPack 2009
TweakNow PowerPack is a fully-integrated suite of utilities that let you fine-tune every aspect of your computer's operating system and Web browser.

The RAM Idle program manages the free memory that is available to run Windows programs. It prevents performance from degrading as you swap files and programs in and out of memory.

The AutoShutdown program lets you suspend, hibernate, or shut down your computer after a specified period of time. In addition to saving resources, this program keeps your system more secure by making it unavailable to unauthorized people.

The CD AutoRun is an extension of Windows' CD and DVD autorun features, giving you additional options for starting programs or listening to music.


Link :
Download Here

itz all FREE
read more...

cara aktifin aero manual

caranya buat aktifin aero secara manual.... sebenernya buat vista... tapi pas diliat sama aja kok...

gini caranya...

1. Buka CMD > Run as Administrator (tau kan caranya???) lalu ketik :
net stop uxsms


2. Jangan ditutup dulu CMD-nya....
selanjutnya buka registry dengan mengetik regedit di startmenu atau di run.
dan pergi ke HKEY_CURRENT_USER\Software\MIcrosoft\Windows\DWM


3. lalu ubah Composition valuenya menjadi 1 dan klik ok...


4. tutup semua kecuali CMD... ketik :
net start uxsms


moga dapat membantu yaa....
read more...

5 Januari 2010

Cara Menempatkan Recycle Bin di Taskbar Windows 7

Buat yg ingin desktop bersih dari segala jenis icon tapi juga ingin akses cepat dan fungsional ke Recycle Bin, bisa dicoba cara berikut:

Pertama kita akan mengeluakan kembali Quick Launch Bar, caranya :

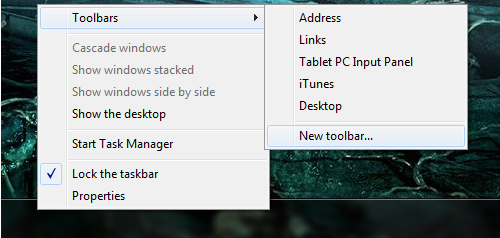
- Klik kanan pada Taskbar Windows 7, arahkan kursor ke Toolbars dan klik New Toolbar


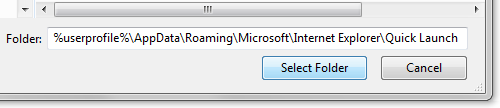
- Ketika diminta untuk memasukan direktori folder, masukkan teks string berikut:

% userprofile% \ AppData \ Roaming \ Microsoft \ Internet Explorer \ Quick Launch


- klik Select Folder

- Setelah itu Quick Launch Bar akan muncul di dekat jam


Berikutnya, adalah menghapus semua Quick Launch yg tidak dibutuhkan, saia akan hapus semua, karena hanya akan menggunakan Recycle Bin disini, caranya tinggal klik kanan di masing2 iconnya, pilih delete.

Kemudian, klik kanan pada Taskbar dan hapus centang pada Lock the taskbar jika belum

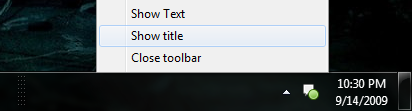
Sekarang, klik kanan pada Quick Launch bar dan hapus centang Show teks, serta Show title.


Selanjutnya, klik kanan dan arahkan kursor di View untuk memilih ukuran yang ikon Recycle Bin nantinya - saia memilih Large Icons untuk mencocokkan dengan Superbar icon.

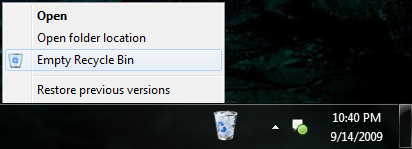
Akhirnya, yang harus Anda lakukan adalah drag and drop ikon Recycle Bin kesini.

Bisa ditempatkan sesukanya dengan men-drag garis putus2, - saia akan tempatkan di dekat jam.

Jika sudah puas dengan posisi Quick Launch bar, relock Taskbar


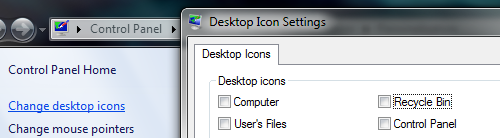
Kemudian sembunyikan Recycle Bin pada desktop dengan mengklik kanan pada desktop dan pilih Personalize, lalu klikChange desktop icons di kolom sebelah kiri dari jendela dan uncheck Recycle Bin


hav fun n met mencoba
read more...

how to use XPMODE on windows 7


Windows XP Mode is an optional feature of Windows 7 Professional, Enterprise and Ultimate editions, that helps small businesses upgrade to Windows 7 by providing a virtual Windows XP environment capable of running many legacy Windows XP-compatible business and productivity applications. With this you can now run your old XP applications on Windows 7 just like other applications and now have access to the USB in a virtual environment. Windows XP Mode (XPM) is a new addition to Wndows 7 RC. At the core of XPM are Virtual PC 7 (VPC) and the Remote Desktop Protocol (RDP) protocol. While VPC’s has a pretty clear purpose, RDP’s are well not so clear. XPM makes heavy use of several RDP features such as Remote Applications Integrated Locally (RAIL), compositing, and multi-monitor support. Windows XP Mode can be installed on the three following Windows 7 SKUs: Professional, Enterprise, and Ultimate.
xpm desktop
Microsoft recommends that customers use Windows XP Mode on a PC with 2GB of memory and 15 GB of additional disk space for Windows XP Mode. In addition, Windows Virtual PC requires a PC with Intel-VT or AMD-V enabled in the CPU, as it takes advantage of the latest advancements in hardware virtualization.

What you will Need:

What You Will Need to Do:

BIOS Virtualization Hardware
1. You will need to turn on the settings in your BIOS for hardware-assisted virtualization, which is a simple setting for both Intel VT and AMD-V equipped processors, which is a simple flip from disabled to enabled. If you don’t have this hardware in your computer you will not be able to use XPM.
kb958559EULA
2. Next you will need to Install KB update package: Windows6.1-KB958559-x86.msu or Windows6.1-KB958559-x64.msu. (I was able to find it on the internet with a simple search-links are above in the What You Will Need section , but should be available as an update after May 5th) Its as simple as accepting the EULA
5-1-2009 2-55-52 PM
Simply choose to install the update.
5-1-2009 2-56-34 PM
The update will install.
5-1-2009 3-31-57 PM
You are now done installing the update and will need to Restart your Computer.
xpmode download
3. Now you need to setup a virtual machine and download the VHD package(VirtualWindowsXP.msi) for your OS version (64bit or 32bit) and install it. 
virtual-windows-xp-vhd
5-1-2009 12-56-32 PM
Virtual Windows XP Setup Complete
Next you will now start your Virtual PC for the first time.
 5-1-2009 3-48-16 PM
4. To run Virtual Windows XP, follow Start > All Programs > Windows Virtual PC > Virtual Windows XP
Virtual Windows XP fail to start
If you don’t have the proper hardware it won’t run and will give you the error shown in the picture above. If you do have the proper hardware make sure it is turned on in the BIOS as mentioned in Step 1.
Virtual XP License Agreement
5. When the virtual machine starts for the first time, the Virtual Windows XP EULA appears. Accept it and click Next to continue.
 VXP Password Set
6. On the next screen, Create a password for the User account. This is a required account with administrator privileges that the wizard creates automatically. It is the default account used to run Windows XP mode.
vxp update
During the setup process you will be prompted how you want to handle window updates for XPM. Choose automatic update settings for Virtual Windows XP and proceed next. 
Setting up VPC
Initializing virtual machine
Starting the operating system
Enabling integration features
7. After completion of first time start wizard, Windows XP Mode is ready to use.
XPM Integration services 

Facts about Windows XP Mode:

Windows XP Mode is specifically designed to help small-business users to run their Windows XP applications on their Windows 7 desktop.
  • Windows XP Mode is available for Windows 7 Professional, Windows 7 Ultimate and Windows 7 Enterprise customers.
  • Windows XP Mode combines Windows Virtual PC and a pre-installed virtual Windows XP environment to allow users run many older applications.
  • Windows Virtual PC will enable users to launch virtual applications seamlessly from the Windows 7 Start menu.
  • Windows Virtual PC includes support for USB devices and is based on a new core that includes multi-threading support.
Microsoft Enterprise Desktop Virtualization (MED-V) is designed for IT Professionals.
  • MED-V enables Virtual PC deployment in larger organizations.
  • MED-V provides centralized management, policy-based provisioning and virtual image delivery to reduce the cost of Virtual PC deployment.
  • MED-V v1 builds on Microsoft Virtual PC 2007 to help enterprises with their upgrade to Windows Vista when applications are not yet compatible.
  • MED-V v2 will add support for Windows 7 (both 32 bit and 64bit) and Windows Virtual PC.
  • MED-V v2 beta will be available within 90 days of Windows 7 GA.
How MED-V adds management to Windows XP Mode and Windows Virtual PC?
To provide a managed, scalable solution for running virtual Windows XP applications, MED-V addresses many of the IT challenges around deployment and management including:
Deployment – deliver virtual Windows images and customize per user and device settings
  • Automate first-time virtual PC setup based on an IT customized script – including assignment of a unique computer name, joining to AD domain
    (for instance: assign the virtual PC a name that is derived from the physical device name or the username to simplify identification and management)
  • Adjust virtual PC memory allocation based on available RAM on host, so that the virtual PC does not take significant resources from the user
Provisioning – define which applications and websites are available to different users
  • Assign virtual PC images according to users and groups
  • Define which Windows XP applications will be available to the user through the start menu
  • Define which websites (e.g. internal sites that requires a previous version of Internet Explorer) are redirected automatically to Windows XP
Control – assign and expire usage permissions and Virtual PC settings
  • Control the network settings of the Virtual PC (e.g. whether it connects through NAT or DHCP, whether its DNS is synchronized with host)
  • Authenticate user before granting access to the Virtual PC
  • Set expiration date, after which the Virtual PC is not accessible to the end user
Maintenance and Support - update images, monitor users and remotely troubleshoot
  • Update images using TrimTransfer network image delivery – update a master Virtual PC image, and MED-V will automatically distribute and apply the changes to all endpoints
  • Centralized database aggregates events from all users, and provides troubleshooting information on malfunctioning virtual PCs
  • Administrator diagnostics mode allows faster resolution of Virtual PC issues
Run on multiple platforms – MED-V will work on both Windows 7 and Windows Vista.
Which customers should use Windows XP Mode standalone?
Windows XP Mode standalone is suitable for small and medium business users, who are able to set their XP applications themselves and may or may not have IT Professional staff. Each PC has its own virtual Windows XP environment that is controlled and managed by the end user. Windows XP Mode standalone is not designed for large, centrally managed deployments that have widely deployed business applications that require Windows XP.
So in summary MED-V builds on top of Windows Virtual PC and adds important management capabilities.
read more...

T3Desk untuk Tampilan Desktop Windows 3 Dimensi


Jika kita menginginkan untuk mendapatkan tampilan Desktop Windows yang lebih 3D, T3Desk mungkin dapat Kita jadikan alternatif alt-tab, yang akan memberikan pengaturan 3D pada Desktop Windows Kita. T3Desk bekerja pada semua versi Windows, tetapi sebenarnya akan lebih mantpa jika digunakan pada Windows Vista apalagi Windows 7. Aplikasi ini dapat mengambil keuntungan dari fitur Aero-Glass.

Setelah meng-install T3Desk, Kita dapat menggunakan shortcut keyboard untuk meminimalkan dan memaksimalkan jendela ke sidebar di Desktop Kita, mengaturnya dalam sebuah modus pseudo-3D. T3Desk dapat melakukan tweak dalam berbagai cara, termasuk memiringkan tampilan jendela, animasi, tingkat transparansi, jarak tampil, dan transisi dari virtual desktop dengan yang digunakan.

Kita dapat menarik jendela dan menempatkannya ke empat sisi monitor, gunakan Aero Peek untuk melihat jendela yang berada pada desktop virtual, dan menetapkan/menyertakan daftar pecualikan untuk aplikasi yang dengan mudah mengecualikan aplikasi dari efek T3Desk tersebut.

Beberapa kekurangan dari T3Desk adalah masalah terbesar bahwa aplikasi ini tidak akan bekerja dengan beberapa monitor. Semua jendela 3D didorong ke monitor utama. Masalah negatif lainnya adalah ketidakmampuan untuk menyesuaikan aplikasi dengan hot keys.

T3Desk merupakan aplikasi gratis dan Windows terbaru termasuk Windows Vista.
Memiliki aplikasi favorit untuk mengutak-atik tampilan Windows dan mengelola aplikasi Kit harus selalu belajar.

Link :

read more...

4 Januari 2010

merubah background media center window 7

Bagi yang sering menggunakan Windows Media Center mungkin agak bosen dengan background birunya. kita bisa merubah gambar background tersebut dengan sesuka kita. ikuti saja cara berikut:

Langkah Pertama: Backup Your Files!!

Pertama tama kunjungi folder “C:\Windows\ehome” dan buat dua salinan (copy)“ehres.dll”. simpan satu di folder untuk editing dan simpan satu lagi dimana saja untuk jaga-jaga kalo gagal, paling tidak ada backup..

Kamu juga harus menerapkan file registery ini. Download file tersebut lalu doubel klik untuk memasukan file registry tersebut.

Setelah selesai anda klik file "ehres.dll" yang asli lalu kuasai ownership-nya, sehingga nanti bisa di timpah/overwrite...

registry download :
here the link

Langkah kedua: Get an Image

Kamu butuh gambar untuk dijadikan background. secara default ukurannya sebesar (500×300) tapi kamu bisa memakai berbagai ukuran. Anda bahkan bisa menggunakan file dengan ukuran HD (1080p and 720p). Untuk tutorial ini bisa menggunakan dahulu file gambar berikut:

link download :
here the link

Langkah Ketiga: Insert into the ”ehres.dll” file

untuk mengedit ehres.dll file anda memerlukan resource editor . contohnya program Restorator. program ini tidak gratis tetapi memiliki waktu trial selama 30 hari. editor ini bisa melihat gambar *.png yang tertanam dalam file *.dll, dan bisa bekerja dalam mesin x86 maupun x64.

Jalankan Restorator, lalu buka file ehres.dll yang tadi anda copy untuk di edit. buka folder “RCData” scroll down sampai anda menemukan “Common.Animated.Background.png”. klik kanan file dan pilih “assign > assign to” from the menu. lalu cari file gambaryang tadi anda tentukan.

setelah selesai save file ehres.dll.

program restorator 2007 Incl keymaker
Here the link


Langkah keempat: Replace the original “ehres.dll”

Setelah selesai di save, kamu tinggal copy-kan file yang tadi diedit ke folder “C:\Windows\ehome” menimpah file asli yang sudah ada. Remember you must have the “Take Ownership” registry fix applied to this file to allow it to be replaced.

Langkah kelima: Launch Media Center

Now you should be able to launch Media Center and see your new background in place. The animated portions of the background will not have been changed, however. To change these you must replace “common.background.layer1.png”, “common.background.layer2.png” and “common.background.layer3.png”. These are the files that are loaded onto the screen to make it appear animated.
read more...

Windows 7 In A Box


"Windows 7 in a Box" is a small application which allows you to easily access almost all system settings in one place. You can open Desktop Personalization, Task Manager, Registry Editor, Device Manager, UAC Settings, Paint, Notepad, Calculator and many other useful system programs. You can even log off, restart or shut down your system using this small utility.


The best thing about this program is its portability. You don't need to install it. Simply run the EXE file and access all system settings. You can even carry it in your USB drive.

You can download it using following link:
Download Here
read more...

Change your Windows 7 Log-on Screen


Gimana cara ganti windows 7 log-on nya .... ada pertanyaan seperti ini :
Q : males ah..(tentu aja malas klo aq sendiri)ntar malah kacau ngutak ngatik file sistem..:
A : gak kok , ini gak ngereplace file sistem kok.. cuma mengganti gambar doank.. si mikocok sendiri kok yang memperbolehkan win7 logonnya di kustomisasi..

Langkah" nya :
1. Download file nya zip nya di DISINI
2. Buka File LogonChanger yang telah didownload

3. Tekan Change logon screen

4. Browse gambar yang mau dijadiin logon screen trz OPEN

5.  Logon Screen berubah, silahkan klik test untuk melihat hasil tadi

6. Tutup Program Tersebut 

atau 

buat yang suka ganti" logon screen bisa pake program ini
Windows 7 Logon Screen Rotator
 
buat pemakaian, di dalam udah ada manual PDF untuk cara penggunaannya

Link : 
Download Here 
 
read more...